Universal Object Storage seeding
Product: CloudBerry Backup
Versions: 4.7 and later
Product type: Standalone, Online (Managed Backup Service)
Platform: Windows, Linux, Mac OS X
Created at: Sep 2, 2016
Updated at: Sep 2, 2016
Author:
Problem
Initial full backup is always painful and may take significant amount of time when offloading data to object storage over Internet uplink. Amazon Web Services (AWS) has Snowball service (basically it is removable storage they ship to customer for initial seeding, and it should be returned back once data is on it and they seed it for further incremental runs). Other providers have their options to seed data. Cloudberry Backup supports out-of-the-box AWS Snowball, but not for other S3 compatible providers. Data seeding is not that complicated, but from the other hand Cloudberry requires certain folders / files structure of is backups, what is not possible to accomplish over simple data offload into directly attached storage that can be shipped further to storage provider (e.g. Windows / Windows file systems does not support colon symbol in files / folder names and this is required by Cloudberry backup structure).
Resolution
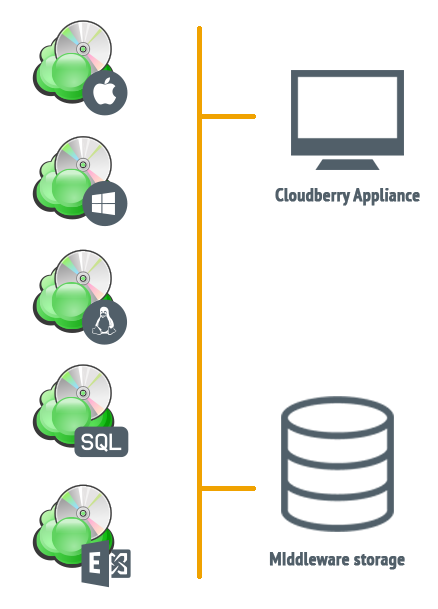
Seeding to object storage can be done over S3 Compatible appliance (Virtual Machine) that customers can download and use as middleware between data and colon supported storage (e.g. NAS with linux file system).
Prerequisites
- Download Cloudberry S3 compatible appliance;
- It is tiny linux machine (Debian 8 jessie);
- It is with based system, no UI;
- It is with SSH server;
- It is with Minio S3 compatible as our seeding middleware;
- It is with v2/v4 S3 API signature support.
- Get NAS (or other storage) with file system that supports colon (consult with your storage provider / NAS supplier);
-
Prepare your backup strategy (e.g. backup plan groups, consider encryption / compression policies).
Configuration of Appliance
S3 compatible appliance is available in VMware Virtual Machine (OVF 2.0) form-factor. Deploy new virtual machine (can be on one of your VMware ESXi or VMware Workstation). Request another form-factor from sa-team@cloudberrylab.com or if you experience issues with downloading this archive once this one does not work or you don’t have certain facilities to run it.
Start the Virtual Appliance and login with cloudberry:Pa$$w0rd. Elevate your permissions to root if you experience issues with mounting shares (Yes, this is not best practice) with root:Pa$$w0rd. Mount your remote share (NAS) with the following example:
$ mount -t nfs <ip_of_your_device>:/folder /mnt/nas/
$ ls /mnt/nas // check your mount, create / delete files / folders, just to make sure you have permissions
Go to your home (cloudberry user) directory (/home/cloudberry/) and execute the following:
$ ./minio server /mnt/nas/

Endpoint:  http://<your_ip_address>:9000  http://<your_ip_address>:9000
AccessKey: <AccessKey>
SecretKey: <SecretKey>
Region:    us-east-1

Browser Access:
   http://<your_ip_address>:9000  http://<your_ip_address>:9000

Command-line Access: https://docs.minio.io/docs/minio-client-quickstart-guide
   $ mc config host add myminio http://<your_ip_address>:9000 <AccessKey> <SecretKey>

Object API (Amazon S3 compatible):
   Go:         https://docs.minio.io/docs/golang-client-quickstart-guide
   Java:       https://docs.minio.io/docs/java-client-quickstart-guide
   Python:     https://docs.minio.io/docs/python-client-quickstart-guide
   JavaScript: https://docs.minio.io/docs/javascript-client-quickstart-guide
This means, that you have your S3 compatible server within Appliance running with v4 Signature support. Now we need proxy, do the following:
$ cd $GOPATH/bin
$ ./s3v2tov4-proxy -l :8000 -f http://localhost:9000 -access <AccessKey> -secret <SecretKey>
If you don’t see any errors, you are set now with S3 compatible middleware and ready to do rest of configuration in Cloudberry lab products.
Configuration of Cloudberry Backup
Download and install (if you have not done yet) Cloudberry Backup for Windows (or Mac / Linux). And start configuartion of your storage account.
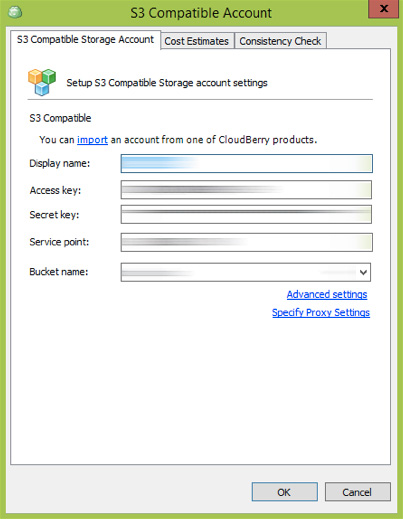
Next step is to configure your backup plan (Image Based, File / folder etc), use your recently created storage account for this. Run backup plan and make sure you have data written to your NAS storage and the structure is not changed (you should be able to see colon element in folders / files). For example in path with files where disk letter (e.g. C:). For example:
cloudberry@cloudberry:/mnt/qnap/backups/backup/CBB_DC$ tree .
.
|-- C:
|   |-- :acl:
|   |   `-- 20160902151528
|   |       `-- 8bae0af739186d8461df58591a9720f1
|   `-- Distribs
|       |-- bootable.iso:
|       |   `-- 20160726133432
|       |       |-- bootable.iso
Seeding is ready and can be shipped to storage provider.
Reuse seeding and keep incremental runs
Your storage provider should offload data to datacenter and provider credentials and endpoint to connect. Configure new object storage endpoint accordingly (in the similar way we did for the seeding storage). Reconfigure your backup plan by changing storage account. You may need to “Syncronize Repository” in «Tools» → «Options» → «Repository» in order to list existing backup data and fit it with Cloudberry SQLite backend.
Nota bene!
Please consult with sa-team@cloudberrylab.com team prior you go seeding!